Sycamore Bark Terrain – Part 3: Painting & Finishing

Part 1: Prepping the bark
Part 2: Building the terrain
Part 3: Painting & Finishing

Required materials:

  • Paints (duh)
  • Brushes
  • Water cup
  • Paper towels or rags
  • Large tub/“flock box”
  • Flock
  • Other finishing materials (Super Turf, Buffalo Tufts, etc.)
  • Tootbrush or wire brush (optional)
  • White glue or tacky glue


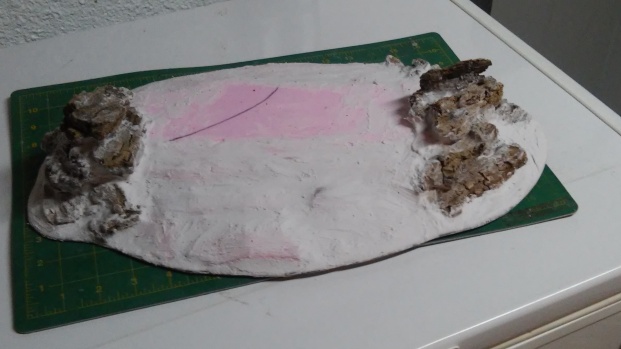
What you essentially have now is a fully-constructed, primed miniature that’s ready for painting.

1

A recap of everything that’s happened up to this point, in photo form. Does this look familiar?


Keeping with the miniature analogy for a moment, the time required for each step of the process of making hills is kind of the inverse of how miniature painting goes. With miniatures, while it does take some time to properly clean and prep a miniature, the vast majority of the time is spent on the actual painting (when doing a high-quality paint job, anyway). By contrast, the bulk of the time required for creating a hill is spent on the “prep work” phase getting it to where we are now. Implication: Most of the work is done by this point, and we’re going to see some dramatic results in a short period of time!


Step 1 – Choose your colors

The type of hill you’re creating will help inform your color choices, not only for your paint, but also for the flock and other foliage you use (if any). For example, if you’re making gently rolling hills (like the one in this tutorial), the colors and amount of foliage you use will be different than if you’re creating craggy hills and spires for a barren wasteland. So in reality, your color choices are hopefully something you’ve been thinking about since you first started cleaning sycamore bark.

The Rule of CoolTM reigns supreme when making terrain; how cool the terrain looks is more important than how realistic it looks. Of course, there’s some interaction between coolness and realism, as part of what makes something look cool is that it looks realistic. But as a rule of thumb, if it comes down to a choice between making something look cool or making it look realistic, I usually go with cool.*

Another point that I keep in mind when creating various types of terrain is that even in the real world, there is a nearly endless amount of variety in the different landscapes that exist. Spend a few minutes searching images online and you’ll see what I mean. When you throw fantasy and sci-fi alien worlds into the mix, the possibilities literally become endless. So, focus on what looks good, and don’t worry as much about realism.

The best practical tip for choosing colors is to remember that objects appear darker the further away you are from them. In the case of miniature wargaming, standing at a normal viewing distance of a few feet away can be enough to make terrain look slightly darker than when you look at it up-close.

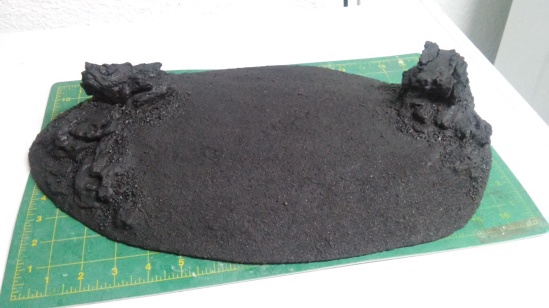
For my rolling hills, I’m going to start with a dark reddish-brown over everything. This will provide a good base for the additional colors I’m going to paint over the rocks, as well as for the “soil” for the flock and other foliage.


Step 2 – Paint the terrain

Drybrushing is the main technique I’ll be using for painting this hill. I’m assuming you’re already familiar with how to drybrush considering that most people in this hobby start with painting miniatures before branching out into making terrain, but for those of you who are not (again, not sure how you got here, but welcome!), I’ll explain. To drybrush, put a small amount of paint on the tip of your brush. Wipe the excess onto a rag or paper towel until the paint that’s left on the brush is very pigment-heavy and feels nearly dry (hence the name). Now, lightly wipe paint onto the terrain using a gentle dusting motion. The pigments will come off onto the raised surfaces of the terrain, effectively highlighting it. You will have to reload and wipe your brush numerous times to paint an entire piece of terrain. Drybrushing is best done slowly and not something to be rushed; the more brushstrokes you use, the more subtle and less chalky the results will be. You’ll get a literal feel for how this works with a little practice.

Conventional miniature-painting wisdom says that drybrushing destroys brushes and for this reason, you want to use cheap brushes. Drybrushing does wear out brushes, but in this case, a worn-out brush won’t have a deleterious effect on your ability to paint terrain. What will have a deleterious effect on your ability to paint is the cramping pain in your hand you’ll get from using a poor-quality brush (looking at you, chip brushes!). Spend a little extra money for a brush that has a comfortable handle. And by “a little extra” I mean $6-$7 for a 2-inch hobby brush with a round ergonomic handle, not a $200 W&N Series 7. If you’re really serious about terrain-making, you can buy something like the brushes in the photo below.

SAMSUNG CAMERA PICTURES

These brushes are my go-to brushes for drybrushing terrain. I have a few other brushes that I use sometimes, but these are my favorites. For you miniature painters out there, the two on the left are labeled as a size 50.


Bristle stiffness can vary. Generally, stiffer bristles work better, but supple brushes have their use as well. Over time, you’ll probably build up a selection of brushes in different shapes, sizes, and stiffness as you experiment with new brushes and learn how you can use them to get particular effects. In addition to different brushes, you should also experiment with different amounts of pressure and the amount of paint on the brush to see what types of effects these variations produce.

For this hill, I didn’t use anything else on the soil besides the reddish-brown, but I used several brownish-grays on the rocky areas. Just like with painting miniatures, in general, the more layers you use, the better the paintjob will look. Drybrush each of your chosen colors onto your terrain.

If you refrain from washing your brush in between switching colors, this will help subsequent layers blend together better. However, you may find that you will have to rinse your brush brush before you’re finished painting as the built-up paint may dry out and make your brush too stiff to drybrush with. If you have to rinse your brush, make sure to squeeze as much water out of it as possible or just switch to a different brush because using a damp brush will wreak havoc on your attempts to drybrush.

345

If you look closely, you can see that I used two different color schemes on the rock formation, light brownish-grey on the left, light grey on the right. I’m a tricky bastage, ain’t I? After deciding which one I like better, I’ll repaint the other one to match. Note also the subtle, but definite, change in color of the soil from the previous picture.


Step 3 – Flock

It won’t be long until the hill is finished. There are numerous companies that make flock, and the sheer variety of colors and levels of coarseness quite large. An important tip here is to buy products that come in quantities intended for use with railroad scenery and dioramas, not for basing miniatures. Basing material is the exact same thing, but sold at a much higher price point.

Flock comes in single colors that you can mix together to make custom blends, but if you’re new to using it, I recommend using a pre-mixed blend. Heck, I still prefer starting with blends and doing a little color customization if I feel like it because they’re so convenient to use! Besides color, you also have to decide how much to use. Is your terrain depicting a lush valley or an arid desert? In this particular case, I’m going to use quite a bit of flock as ground cover.

The process is very similar to applying the first layer of sand, even down to using a sand box (“flock box” in this case, I suppose). If you have the space and a few extra dollars, I strongly recommend having separate tubs for sand and flock. Having them ready to go when you need them without having to rinse them out in order to switch from one material to another is quite handy. To recap: 50/50 white glue/water mixture (use a cheap brush for application), work in manageable sections, sprinkle on flock, shake off excess, let dry. The key difference with flock, however, is that rather than coating the entire surface of the hill, in this case, I’m intentionally leaving  some bare patches of soil showing through, as this is usually more interesting than a solid green carpet (although feel free to go solid green if that’s what you prefer). I’m also gluing some flock onto the rocks.

6

Note that the bare batches peeking through are deliberate.


Once the base ground cover is dry, go back and add in some highlight colors, as this adds greater depth and visual interest. For this piece, I’ve simply used a brighter green blend, liberally applied. Try to be somewhat random in how you apply the flock. I’m also being careful to still leave a little bit of bare soil showing. Randomness is especially important for the highlight colors; put different amounts in different locations. You can also experiment with using a dry stencil brush, toothbrush, or wire brush to create more bare patches, although I haven’t done that with this piece. Just be mindful that you don’t scrub too hard if you try this or you can end up scrubbing all the way down to the foam!

7

Looking good, if I do say so myself. We could stop here and call it finished, but we’re going to do some more work to really put it over the top.

Once everything is dry, give the whole thing a generous spray with a diluted white glue/water mix (1:3 to 1:4). This is especially important because flock has a tendency to come off if not glued down sufficiently. After spraying, wait for it to dry again while you read about the next step.


Step 4 – Accents

We’re almost there. To make this piece really pop, we’re going to add some extra foliage in a few different colors. Again, like flock, there are myriad options out there, almost to the point of being overwhelming. Two materials I really like using are Super Turf and Buffalo Tufts. Super Turf has a really neat physical structure that makes it look great both in small amounts or large clumps. Buffalo Tufts are perfect for simulating patches of longer grass or weeds and look awesome with minimal work.

Super Turf can be applied by hand, but it’s easier to use tweezers to pull Buffalo Tufts from their adhesive sheet and apply them where you want them. Use dabs of white or tacky glue to attach them to your hill. It’s helpful to apply 50/50 white glue/water to the Super Turf after you place it, but use a dropper bottle of some sort (an empty white glue bottle works well for this) instead of spraying the entire piece again because the 50/50 is unnecessary for the Buffalo Tufts and can even affect how the strands splay out.

PRO TIP(TM): When adding accents, remember, you’re adding accents. Less is more. Just like with salt, pepper, parsley, rosemary, and LSD, you don’t want the supporting flavors to overpower the main dish. The right amount of accents will fit perfectly with your terrain and enhance the overall effect/realism/coolness. Too much, and it’ll just look obnoxious and noobish. Also, accents should be random, but don’t try too hard to be random; it sounds like kind of a zen thing, but don’t be random, just be. Random placement of accents is crucial to kicking the overall effect up a notch, but it’s actually one of the trickiest things to do properly. Learn to let go, don’t think about it too hard, and just let the terrain guide you. (Whoa, I wasn’t kidding about going easy on the LSD.)


SAMSUNG CAMERA PICTURES

Congrats on finishing your hill! You now have a terrain piece that you can be proud to display and game with. It’ll take a while to make enough terrain to cover an entire table, but the techniques shown here produce durable pieces that should last for a long time with some common-sense care (in other words, don’t use your terrain as a foot stool when you can’t reach the top shelf in the cabinet).

You can alter the techniques shown here in almost any number of ways. Online photos provide a limitless source of inspiration. If you can imagine it, chances are that something like it exists somewhere in the world. Experiment with different shapes and sizes of hills. Use different materials, such as pine bark and lava rock. Make towering cliffs or plateaus. Make spires. Experiment with different types and colors of flock. Make some alien-themed pieces and paint them purple.

If you’d like to make some of the early parts of the terrain-making process a little easier, or even just buy terrain that’s ready to go without requiring any work on your part, I know a place where you can get some:

https://www.etsy.com/shop/Terrainify

Happy gaming!


SAMSUNG CAMERA PICTURESSAMSUNG CAMERA PICTURES

* Incidentally, this is also the same decision-making process used by female members of the human species of child-bearing age when trying to choose between potential sexual partners. Think about it. Who do chicks dig more: the buttoned-down, responsible guy with a boring, yet stable job, or the bad boy rebel with wild hair and motorcycle who exudes “devil may care” charm?

Gents, the upshot of this is that if you learn how to make cool terrain, you will be cool, and thus, you will be a hit with the ladies. (Hey, it worked for me. Or did it work in spite of my terrain-making and other geeky interests? Nah…) Ladies, possessing mad terrain-making skillz is a worthwhile investment for you as well, but will be superfluous for attracting a potential mate; in the right environment, the ontological fact of your being female will be enough to provide you with a plethora of viable, eager reproductive partners. And by “right environment,” I mean your stereotypical basement-dwelling cadre of gamers or FLGS patrons.

However, in recent years, there has been anecdotal evidence of an upward trend of gamers as an aggregate becoming more socially competent and, dare I say, hygienic. Not to mention an increase in the number of basement dwellers and FLGS patrons who are also female. Meaning that you may eventually have to up your game (no pun intended). So, on second thought, ladies, study these tutorials and learn how to make kick-ass terrain in order to gain you a competitive advantage over those non-terrain-making strumpets!

Sycamore Bark Terrain – Part 2: Building the terrain

Part 1: Prepping the bark
Part 2: Building the terrain
Part 3: Painting & Finishing

Required materials:

  • Sycamore bark (duh)
  • Chunks of insulating foam
  • Hot glue gun
  • White glue
  • Tacky glue
  • Snap blade knife
  • Filler (aka, spackle)
  • Paint brushes
  • Stencil brush or other small, stiff brush
  • Water cups
  • Sand paper and/or sanding block
  • Sand (sifted into fine and coarse grits)
  • Sandbox or other container

After prepping a piece of vinyl tile to use as the base, we’re now ready to begin constructing the hill. (What do you mean “MDF”? Didn’t you read that other tutorial yet!?!)


1

Note that the grid units on the cutting mat are inches – this is going to be a decent-sized hill.


Step 1: Bulk up using foam

The areas of the base that are marked off with circles indicate where we’ll be placing sycamore bark. I like circles. Feel free to use X’s, squares, trapezoids, or even non-Euclidian geometric shapes if you prefer. We want to put foam everywhere else. The foam is what will form the bulk of the shape of the hill – its height, slopes, etc. You can really experiment during this step to create different kinds of effects for your hills depending on the shape of the foam, how much you use, and how you position it. I’ll be making a relatively tame “rolling hill” in this tutorial, so I’m starting with a big, mostly flat slab of foam. The foam does not have to be flat and level throughout; using a piece with a slight slope to it can help give your hill more character.

When gluing large pieces of terrain together (such as foam and bark when making hills), hot glue is the preferred tool of choice. White glue is easier to work with (to about the same degree that a straw makes it easier to drink from a cup), but don’t. Really, just don’t. It will take way too long to dry, and that’s while working on a project where 75% of the time it takes to make the thing is waiting for stuff to dry in between steps. (Seriously, as you go make your way through this tutorial, count how many times you have to wait for things to dry.) Hot glue takes mere moments to solidify, meaning you can build up layers of foam (and later, bark) quickly, without having to worry about the layers underneath shifting around because the glue is still wet.

2

Here’s a photo of my gun – er, I mean, tool. Huh, what’s a double-entendre?


Of course, now that I’ve extolled the virtues of hot glue over white glue for this application (see what I did there?), I will say that on some large hills (like the one in this tutorial), I will actually use a thin layer of white glue to affix large pieces of foam to the base. The reason is that I’ve had issues with the hot glue causing the tile to warp upwards a little and not sit as flat on the table as it otherwise would. Out of the bottle, white glue is normally significantly cooler than hot glue coming out of a glue gun, thus it won’t cause issues with warping.  And if it’s not significantly cooler, why on earth are heating your white glue?!?

After pushing the large foam pieces into place, go back and put a thin layer of hot glue around the edge where it meets the vinyl. The reason for this is to hold it in place while the white glue dries. I use both glues for all large pieces that touch the base, but hot glue alone suffices for smaller pieces.

TL;DR: White glue sucks for making terrain. Except when it doesn’t.

Continue gluing pieces of foam in place. We’ll make some adjustments in a later step, but right here in the first step is where you define the height, slope, and contours of your hill. Be generous with the hot glue so that all of the foam pieces form a strong bond. Once you’ve finished gluing all of your foam, take a snap blade knife and use it to trim the edges between the foam and make them smoother. You don’t have to get it perfect; we’ll smooth it as part of those adjustments in a later step.

3

Step 1 complete. Note that hot glue was used anywhere two pieces of foam come together.

Spend some time with this first step. Envision in your mind what you’re going for, and use some miniatures to test how your hill will work for gameplay. See how many miniatures you can fit on the surface of the hill, and make sure your slopes aren’t too steep to place them on the side. Of course, nothing beats hands-on experience for this sort of thing, so even if your first hills don’t come out perfectly, you’ll learn how to make improvements with your later efforts.


Step 2: Add bark

You spent hours collecting and cleaning your sycamore bark, and now the real fun begins! Grab a few pieces of bark and dry-stack them together on the areas that are marked off. The foam is the workhorse on these hills, forming the bulk and the actual playable surfaces where you can put miniatures, but the sycamore bark posing as rocks makes it much more visually interesting, not to mention creating impassable areas that affect movement, block line of site, etc. You should have various shapes and sizes of bark, so experiment to find what you like best before gluing anything. This time around we’re using hot glue, period. No exceptions. You can build modest outcroppings and ridges or large spires and formations; imagination and preference reign supreme!

4

A few tips for this step:

  • Even though we glued the foam chunks down and did some carving with the snap-blade knife in the previous step, it’s ok to do more gluing and carving in this step as necessary.
  • The hot glue should be hot enough to melt the foam a little when it’s first extruded. Use this to your advantage by pushing the bark into foam when you glue it in place to create an even stronger bond.
  • The bark will not always fit together perfectly. Be generous with the hot glue and use it to fill in large gaps any secure and wobbly pieces. This stuff is very strong when it solidifies.
  • Don’t worry if you end up with blobs of hot glue visible on the bark; we’ll cover that up in the next step.

5

After the next step, no one will know that unsightly blob is even there. Well, you will, but anyone who doesn’t read this tutorial won’t. And that, folks, is what lies at the heart of good terrain-making: concealing the unsightly.


6

Harry Hormagaunt and Ollie Ork Boy inspect the progress on their new battlefield before getting ready to eviscerate each other.


Step 3 – Apply filler

Apply filler using whatever tool you prefer. You have many choices here. If you’re going to use a brush, a chip brush works well. Scraps of corrugated cardboard work decently well, and have the advantage that you can just toss them instead of having to wash them. I’ve found that even when I start out with a brush , I resort to using my fingers at some point, so I’ve taken to foregoing any pretense of working in a civilized manner and just use my fingers from the get go. It doesn’t really matter what you use, as long as you get the filler where you want it to go.

The filler serves multiple purposes. First, it blends the areas where the sycamore bark and foam come together, creating a smoother transition. The other area it smooths are any gaps between the pieces of foam…”filling” them, if you will. If you find that the filler is too tacky, you can try dampening your fingers or whatever tool you’re using.

The next place you want to apply filler is over any of blobs of dried hot glue. See? I told you we’d take care of them. You can also fill any large gaps between pieces of bark, or leave them if you want them for visual interest. A small, stiff brush, such as a stencil brush, works best for getting filler into the gaps between the “rocks”.   Get a lump on the brush, dip in water, and jam it into the gaps.

78

Once you’re done applying the filler, hurry up and wait for it to dry. It’s best to leave it overnight at the very least. If it’s soft, it hasn’t set yet. It’s also possible that you may have to apply more than one layer in certain areas after the first one dries. Resist the temptation to go on to the next step before the filler is completely dry and set; all you’ll succeed in doing is making a mess and ruining the work you’ve done up to this point.


Step 4 – Smooth the surfaces

Once the filer is dry, it’s time to give the hill a smooth surface. You can use whatever sanding method you prefer, but I recommend a sanding block with a medium to coarse grit. Sand off all of the rough patches of filler and any edges that remain on the foam. You can also create some subtle contours if you work at it long enough. Sanding will produce a lot of dust, so I recommend doing this outside and wearing a mask. You might even want to change your clothes after doing this.


Step 5 – Add texture

After sanding the hill, the next step is to sand the hill (badum tish!). Things get even more visually interesting in this step. First, add a layer of fine sand to the entire surface of the hill, except for the bark. Basically, you want to cover up any foam or filler that you see with sand.

I strongly recommend using a “sandbox” when applying the sand. This will keep the excess sand from spilling everywhere as you apply it and give a place to shake off the excess. Once the hill is covered, wait for it to dry.

9

Not just for children anymore! Note how the box is big enough to hold two tubs of sand along with the large hill. The bigger the better. There’s nothing better than not having to sweep up sand after a hard day of making terrain.


Unless you’re working on a really small hill or outcropping, you’ll probably have to work in sections. Using a 50/50 mix of white glue and water, brush the mixture onto a workable area, pour the sand on, then shake off the excess. PRO TIPTM: Don’t apply the sand all the way to the edge of the area that you applied glue; leaving an edge of glue will make it easier to apply the glue for the next section.

10

Take little bites. You’ll notice that it’s almost impossible to keep a super clean edge of sand, but you get the idea.


11

Loving that zen-garden look!


After the first layer of sand dries, apply some coarser sand to selected areas. To be honest, you can usually get away with going on to this part before the first layer dries, but it’s easier to wait. Your call. A good place to add more texture is the base of the cork where it meets the foam to simulate weathering and small pieces of rock that have fallen away, but you can add coarse patches of rock anywhere on your terrain to make it more visually interesting. In fact, if you don’t plan on using much flock, you should definitely do this to break up the surface monotony of the first layer of sand.

1413

I didn’t bother putting coarse sand over the main part of this hill because most of it is going to be covered in flock later on.


Next, add some larger rocks that you place individually if you like. When applying these, use tacky glue at full strength. But you don’t have to stop with rocks! You can experiment with other scenery items as well, such as ruins, bones, burned-out buildings, vehicle wreckage, mutilated corpses, dead puppies, and other happy things that adorn so much of the grimdark landscape of this fun, child-friendly hobby of ours known as miniature wargaming.

14

It’s the same picture because I chose not to add any ruins, bones, burned-out buildings, vehicle wreckage, mutilated corpses, dead puppies, or anything else to this hill.

Once everything dries, you can spray a thinned-down mix of white glue/water (about 1:3 to 1:4) to seal everything if you like, but I’ve found that the paint in the next step creates a strong hold over everything.

Given that this step involves painting, one could argue that it should technically go in Part 3, which is titled, incidentally, “Painting.” I’m putting it here because everything leading up to Part 3, including priming, is getting the hill ready for actual painting. Besides, it’s my blog, and I get to make the rules!

There’s not much to this, really. You’re applying a prime coat to a model. If you don’t know what this means or how to do this, I don’t know how the hell you found this blog in the first place, but it’s great that you’re here! For the sake of completion, and because I know how enthralling my mastery over the English language and skill with the written word is, I’ll oblige.

The color of your primer is your choice to make. I most often prime with black, but that’s because a black undercoat works best for the color schemes that I use the most. If I were making snow-covered terrain on the other hand, I probably wouldn’t use black, although I probably wouldn’t use white either; perhaps yellow… If I were making snow-covered terrain, covered in an oil spill that’s being treated with white graphene nanosheets, I, um…well… Hey, look over there! Some noob put twin-linked deathspitters on his carnifex! Ha! What a dummy!

Cheap craft paint works for this, but flat black, interior latex paint may be more economical if you’re going to be making a lot of terrain. Using the largest brush you can get away with will speed up the process. A 2”-3” brush is good for covering most of the hill, while a smaller one is useful for getting into nooks and crannies. You can use the paint straight from the bottle or can, but thinning it with a little water works better in my experience. Thinning can be as simple as dipping your brush in a cup of water before dipping into the paint. You read that right: I don’t even bother thinning the paint in a separate container. If there’s a half-assed way to make terrain that gets good results, I’ll find it.

It’s very likely that you’ll need more than one coat of paint, at least on some areas of your terrain. While sand en masse is quite absorbent, the individual grains are not. You can see this clearly when you paint the coarse sand, as the paint will have a tendency to run off, leaving it only slighty covered. Take the time to retouch any areas that need it, it’ll make the end result better.

It’s crucial to make sure that the paint is completely dry before moving on to the next step. A downside of using latex or craft paint, especially when thinning with water, is that it softens the glue that we used to stick the sand and rocks to our hill. If you start the next step, drybrushing, before the sand has cured again, you’ll very quickly scrape away the layers of sand you spent so much time lovingly applying. There’s nothing more aggravating than wasting time going back to fix work you’ve already done once, so play it safe and make sure it’s dry.

I find this step to be really exciting because priming the hill eliminates its hodge-podge appearance and gives it a clean, uniform look. Once the prime coat is completely dry, you’ll have a durable, attractive piece of terrain. Besides creating a visually appealing texture that lends itself well to painting, the sand and glue give the terrain a tough outer shell. The vinyl base is also quite durable, so unless you’re actively trying to destroy your terrain, it’s going to last for a while.

15

Congrats on making it this far. It actually looks like a hill. A big, impressive, monochrome hill. Now go add some color and finishing touches!


Part 1: Prepping the bark
Part 2: Building the terrain
Part 3: Painting & Finishing